


I’m here today with a sadden heart. This is our last Challenge #95 for Color Me Creative and the theme is all about FRIRNDS and this challenge ends on July 11th, 2014. I have been with the community for 4 years, I do have to tell you. I remember when I first found Suzanne (God Sent) when she told me what the numbers and the letters on the copic markers meant she made me so happy and things started to make since at least a little at that time because I was buying my markers because I loved the colors. I did not know they need to work together, then when she started the classes I was right their to sign up and I learned so much from Suzanne. The community will be their for awhile but my dear friend Suzanne has new adventures.
Our Fabulous Sponsor this challenge is


This is one of my SVG files from my Silhouette Cameo. The paper color is Egg plant. I used DCWV The sweet stack.

Side views.

This is what the back looks like.

For the handle, I used on of Fiskars Dots edger punch and Martha Steward doily lace trim on top. Added the MS Monarch butterfly on top. Some pearl pen color sunny yellow.

Close up of the Birthday pin. Just down a little I will show you how to make this.

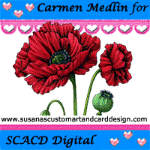
Copic markers I used to color the image. The close up of the image.

Birthday Pin
I used Stampin up punches but you can use any punches you want. The first one is 1 3/4 (scalloped), second one is 1 1/2 (round) and the third one is 1 1/4 (scalloped). You only need to punch one of each.

You can use any colors and shapes. I stamped the sentiment on the last one before I put the pin together. The ribbon would be nice if you could match it to your colors. Depending on the size of the pin cut the ribbon so it will fit just an inch 1 or 2 under the pin and glue it to the back. You can sponge around the edges of all or just one (up to you). I stamp the Happy Birthday with Memento tuxedo black ink. The stamp I have no idea who made it (sorry).

You can use a pin (safety) to put it on the Birthday person. As far as the sentiment you can make these pins for all kinds of occasions, it is up to you. Enjoy and and have some fun with it.

Thanks so much for stopping by. Have a great week.


8 comments:
Your coloring is always beautiful and this is an example of another perfectly colored image. Wonderful creation, Pat!
Gorgeous bag, Pat!! Love your coloring and I, too, learned how to use copics from Suzanne Dean. She made it easy and she made it make sense, just like you said! I wish her the best!
Hugs
Darcy
Aww, that's sad to see something so wonderful come to an end, but I know it's all for a good reason. I just LOVE what you've done with this bag Pat. Your coloring is always spot on and my favorite is the red little polka dot patches :) Beautiful job.
Suzanne taught you well, as this beautiful treat box with that beautifully coloured image shows.
I wish her well in her new ventures. You my friend, wil lbe just fine. xxx
I was sorry to hear that the CMC challenges were coming to an end. Seems that so many are doing that lately. Cycles, huh?
This is just precious! Really love the fun design & papers you chose! And your image is just darling! Love your coloring and embellies, too! :^)
Hugs, Penny
What a cute little basket, beautifully designed and created, I will miss our little Copic family but will still be around to check out all your wonderful creations
Hugs Julie P
You're great at coloring, Pat, you sure have learnt how to combine different shades and colors well! I like what you did to the space around the image as well. It's a wonderful gift wrap project!
What a beautiful gift bag Patricia!! I love all of the elements you added, and the tutorial on how to do it.
Post a Comment